Building Regulations: Chimneys, stoves & fireplaces
If you’re thinking about fitting, altering or replacing an external flue or chimney or installing a new woodburning stove, read on for our essential guide to complying with the Building Regulations

Fitting, altering or replacing an external flue or chimney or installing a new woodburning stove all fall under the Building Regulations, although they are not typically tasks that require planning permission.
As you’d expect, the requirements controlling new chimneys, flues and appliances are safety based and very detailed. When it comes to complying, you have a choice:
- using a HETAS installer registered under the government’s Competent Person Scheme to self-certify the work
- giving notice to your building control body.
Preparing for the Works
It is essential to have the chimney inspected and swept before installation:
- Old chimneys are often inefficient and there’s potential for lethal gases to leak through the chimney walls.
- Chimneys on party walls may have brick flues that share the same structure. They are quite capable of leaking from one to another – often only half-brick walls separate them – and hence it is possible to smoke out your neighbour’s house by accident!
- No flue lining: Chimneys built before 1965 often have no flue lining and are in poor condition. Mortar joints are often corroded, ‘eaten’ away by acidic condensates and soot deposits. Because of this, and the risk of smoke leakage, many installers insist on lining the chimney before installing a new appliance. While it isn’t a Building Regulations requirement, it is the norm and certainly good practice.
If you’re still keen to reuse an old unlined chimney, a visual inspection (by mirror and core ball) plus a smoke test are essential and should establish whether there are any problems.
Finally, the Clean Air Act designates some areas as smoke control areas. This affects the type of appliance you can install and the fuel that can be burned in it. For more information contact the environmental health department at your local authority.
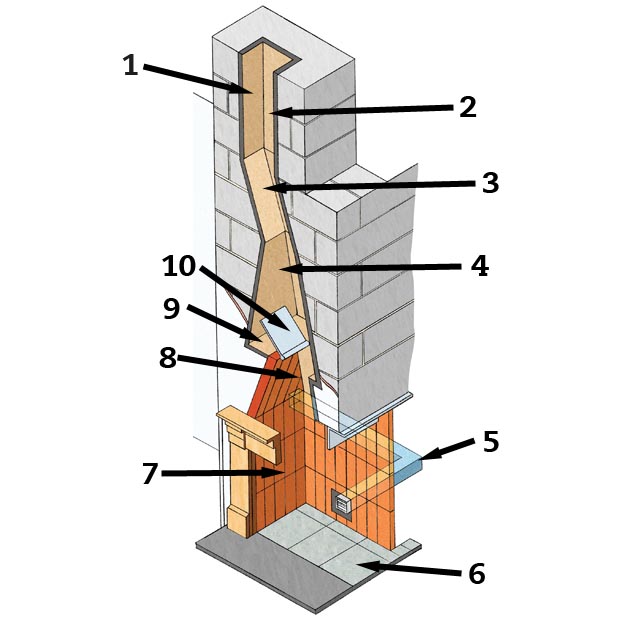
Understanding Chimney Components

A handy breakdown of the components of a chimney
A Flue lining Usually made of refractory concrete or impervious clay; sometimes metal
Bring your dream home to life with expert advice, how to guides and design inspiration. Sign up for our newsletter and get two free tickets to a Homebuilding & Renovating Show near you.
B Flue Must be high enough for sufficient draught, around 4.5m in most cases
C Flue connector Connects the fireplace to the flue
D Smoke chamber Here the smoke gathers before being passed into the flue
E Smoke shelf Prevents downdraughts
F Damper A pivoted sliding metal flap that regulates the amount of draught, preventing excessive variations. It can also close off the fireplace from the outside of the house, preventing air loss
G Gather Improves draught and reduces pressure in the smoke chamber
H Air Inlet Controls the quantity of outside air supplied for combustion
I Hearth The required thickness depends on the appliance
Re-lining Chimneys
In the past, the sectional flue systems of clay, ceramic and concrete were used to re-line chimneys with bands at the joints. These have been replaced by flexible stainless steel tube flues that can be lowered down from the top as a tube in one length. Many of these need to go in the right way up and have arrows marked on them pointing in the direction of the smoke — upwards. Some may not and it’s possible to install them either way, but it is essential to check with the manufacturer first.
- A smokeless fuelled stove not exceeding 20kW must have a diameter of no less than 125mm
- A stove over 20kW and up to 30kW, burning any solid fuel, must not be less than 150mm in diameter
Your stove manufacturer will also advise on the flue diameter, type and other requirements needed. It is best practice to install a minimum size of 150mm if you can to ensure it’s safe to use, regardless of the type of fuel to be used.
Enamelled steel pipes are used to connect the stove to the chimney system and as these will become hot in use, they must be positioned at least three times the diameter of the flue away from combustible materials. For example, a 150mm pipe must be fixed at least 450mm away. This is particularly relevant near to timber studwalls.
If the combustible material is separated from the flue by a non-combustible shield (for instance, a cement-based fire protection board used behind appliances), the distance can be reduced to 1.5 times the diameter of the flue.
There is no maximum height for this connecting flue pipe but it must not extend outside the room containing the stove. Keeping it as short as possible will also help the chimney ‘draw’.
New Masonry Chimneys
Some bad examples spring to mind of single-skinned metal chimneys passing through a cupboard, room or roof space with DIY insulation that have resulted in serious fires. Even with the proprietary double-walled insulated types, there are still air gaps required and components to separate the chimney from any timber to maintain the fire resistance of the floor.
Usually constructed of sectional flue liners and components made from clay, ceramic and concrete, a new chimney can be formed by surrounding the liners with at least 100mm of brick, filling around the liners with vermiculite or insulating concrete. All new chimneys must be built on suitable foundations with a damp-proof course no less than 150mm above ground level and appropriate weathering where they pass through the roof.
It is worth considering the type of brick and pointing to be used as well, because some of the most decorative prove to be less than weather-resistant later, resulting in damp walls as wind-driven rainwater penetrates.
Because even lined chimneys can still get hot, timber joists, floorboards or rafters must be trimmed back by at least 40mm from the chimney outer face as it passes through the roof and floors.
To some extent, the heat issue with masonry chimneys can be overcome by choosing an insulated factory-made chimney instead.They can be unsuitable in conservation areas, as the polished stainless steel of these large diameter models can look a bit like a NASA launch site, Nevertheless, they remain a popular alternative to masonry chimneys. The casing encloses high performance insulation, which means that you can still touch it when it is in use without getting burnt.
Outlets from Flues and Chimneys

Need more advice or inspiration for your project? Get two free tickets to the Homebuilding & Renovating Show.
The biggest complaint about chimneys comes from neighbours in urban areas who find themselves downwind of a new one. Flue gases from the stove must be able to discharge freely without presenting a fire or health hazard, whatever the wind conditions.
This means that the flue outlet needs to be positioned sufficiently high above the roof surface and surrounding buildings to prevent it being affected by wind eddies or downdraughts. The Building Regulations identify the zone for this, but any of these dimensions may need to be increased where there is exposure to:
- high wind speeds
- adjacent tall buildings
- high trees
- high ground
Hearths for Stoves
Fires from stoves are rare but they do get super-hot and heat from the stove or burning fuel that might accidentally fall out of it needs to be considered. A hearth does the job as long as it is big enough:
- It should be raised from the normal floor finish to identify it, and project at least 50mm from the stove sides and 300mm from the front of the stove when a stove is positioned within a fireplace recess
- For a freestanding stove (not in a recess) the hearth should be 840mm x 840mm
The thickness can be included as part of a solid concrete floor slab or beam and block concrete floor, while smaller stoves with lower operating temperatures can be of glass or thinner decorative materials.
Ventilation
The ventilation area is based on the rated output of the appliance. Because we now build homes with airtightness in mind for energy efficiency, the ventilation needed has increased for homes built from 2006, which might have airtightness of five or less.
Some manufacturers now produce models with a ‘total’ or ‘partial’ direct air supply. This provides some or all of the air required for ventilation from an external air supply rather than from just within the room, to address this issue in airtight homes.
Carbon Monoxide
It is also essential to ensure you have a permanent source of air that keeps the stove burning efficiently and avoids the production of carbon monoxide, a highly toxic, colourless and odourless gas that has potentially fatal consequences.
Carbon Monoxide Alarm
Even with the ventilation provision met, the Regs require the installation of a carbon monoxide alarm in rooms containing any solid fuel combustion appliance. These devices are usually battery powered and have an alarm to alert users when the working life of the detector is due to expire.
Alarms should be within 1-3m of the appliance and either:
- On the ceiling at least 300mm from any wall
- On a wall as high up as possible (above doors and windows) but at least 150mm from the ceiling
Commissioning
Many local authorities require installers to provide them with a commissioning checklist following the installation of a solid fuel stove and/or a new chimney or chimney lining. A blank example in the back of Approved Document J can be used for this purpose. You should, in turn, be provided with a completion certificate from your installer or main contractor.
Full details of the relevant Building Regs can be found in the Approved Document J (England and Wales) or Section 3: Environment (Scottish Building Standards Guide 2017).
Paul is a Chartered Building Engineer and has been a building control officer since 1984. He has written eight books on home improvements and building homes, including the Complete Handbook of Home Extensions and Creating an Eco-Friendly Home & Workplace. He provides his insight and knowledge on Building Regulations with Homebuilding & Renovating.

