Getting the building foundations right is key to preventing future structural issues for your self build or extension. Get to know the process with this step-by-step guide
(Image credit: David Snell)
Building foundations function to distribute the weight of your home, stopping the plot’s subsoil from spreading and the structure facing an unequal settlement — both of which could lead to structural problems for your home down the line.
If you’re the project manager for your self build or taking on the work yourself, it’s critical to double check all measurements for the building foundations and make sure everyone on site is working from the same plans to avoid costly mistakes that are difficult to rectify.
The type of foundations system you choose may depend on the type of soil you’re laying your building foundations into, however a good team should have a level of flexibility in case they discover some surprising ground conditions during the excavation. Arm yourself with our guide to foundation systems and soil types, as well as keeping some budget back as a contingency for the foundations.
Whether you need a refresher on the process, or just want an overview about what foundations will entail for your build, take a look at this step-by-step guide for laying out building foundations.
What Materials Do I Need for Building Foundations?
To start laying the building foundations, you'll need:
mesh reinforcement in the foundation concrete
compressible material for lining the trenches
a polythene slip membrane
cut metal pins to use as markers ready on site
several rakes and pairs of wellies (you’ll be surprised how many people turn up for work in trainers)
(Image credit: David Snell)
Be aware of any lead-in times. If the engineers have designed a foundation that requires reinforcement cages, these may have to be manufactured off site.
Also think ahead to getting the services into the house, so get some lengths of pipe or ducting to take through the concrete.
How to Lay Building Foundations
1. Start Building Foundations by Marking Out a Level Datum Point
Mark out a level datum point.(Image credit: Homebuilding & Renovating)
Whats is a datum point?
A datum point is a point of reference from which further measurements can be made. The point can be based on the finished floor level, an existing building or a benchmark.
First you will need a level datum point. If you are building an extension, this is usually the finished floor level or damp-proof course (DPC) of the existing building. For new builds, this will be marked on the plan as a fixed point such as a manhole cover or a marker in the road or pavement.
The datum point is important: all your height measurements are relative to this point, so any errors could cause problems later on, particularly if there is a height restriction placed on the building.
2. Calculate Material to be Removed for Building Foundations
Calculate how much material needs to be removed and cleared as a starting point for your foundations and oversite.(Image credit: Homebuilding & Renovating)
Next, calculate how much material needs to be removed from the site to end up back at finished floor level once all the layers of flooring materials (insulation, concrete, screed, etc) have gone down. Time taken with a site level at this stage will make things easier later on when the digger may not be able to reach any areas that have not been dug deep enough.
3. Use String Lines to Mark Out Your Building Foundations
Start marking out the walls, starting with one corner point(Image credit: Homebuilding & Renovating)
Start marking out for the walls. Set up timber hurdles at the end of each wall, out of the way of where the digger will need to be. These carry the string lines that represent the wall faces of your building. Where space is limited, use corner pins instead and set up the hurdles after the concrete is in.
4. Mark Out the Trenches for Your Building Foundations
Use marker paint to mark out your footings(Image credit: Homebuilding & Renovating)
Begin lining up your footings by referring to your datum point. When it comes to extensions, never assume an existing building is square; pick the side you need to be square to and set up a line, then square off that line.
The easiest way to do this is using Pythagorus’s theorem (the square of the hypotenuse is equal to the sum of the square of the other two sides). If you measure the length of your first wall and then secure a tape measure at each end, by working out the length of the hypotenuse you can use both tapes to give you a third point exactly 90° to your first line.
Alternatively, most modern laser levels have a square function which does this for you.
5. Mark All Corners of the Building Foundations
Once you have two lines set up at 90°, other measurements can be taken(Image credit: Homebuilding & Renovating)
Once you have two lines set up at 90°, all other measurements can be taken from this point, with all corners and junctions marked. A lot of digger drivers are quite happy for you to mark ‘centre of dig’ lines, but you may prefer to mark both sides of the trenches.
Check the width your walls and allow 150mm both sides, then use a string line as a guide to mark the trenches with marker paint.
6. Start Digging The Foundation Trenches
Digging the trenches can begin(Image credit: Homebuilding & Renovating)
Now you’re ready to start digging. Have your site level set to the depth you need to dig and check it often. Ultimately it is down to the building control inspector to decide how far down you need to go; they will inspect at this stage and advise.
7. Introduce Depth Pegs and Pour
Introduce depth pegs in the trenches to show where you need to fill concrete to(Image credit: Homebuilding & Renovating)
Once Building Control has visited, you are ready to pour the footings. You should place depth pegs in the trenches to show you how deep to fill, but you may find that marking the sides of the trenches with marker paint also works well, with a final onceover with the site level and a concrete rake to get them spot on — the more accurate you can be with your levels the easier (and cheaper) the next stage will be.
Also make sure that ducts are installed for any pipes or cables that need to cross the trench below the concrete.
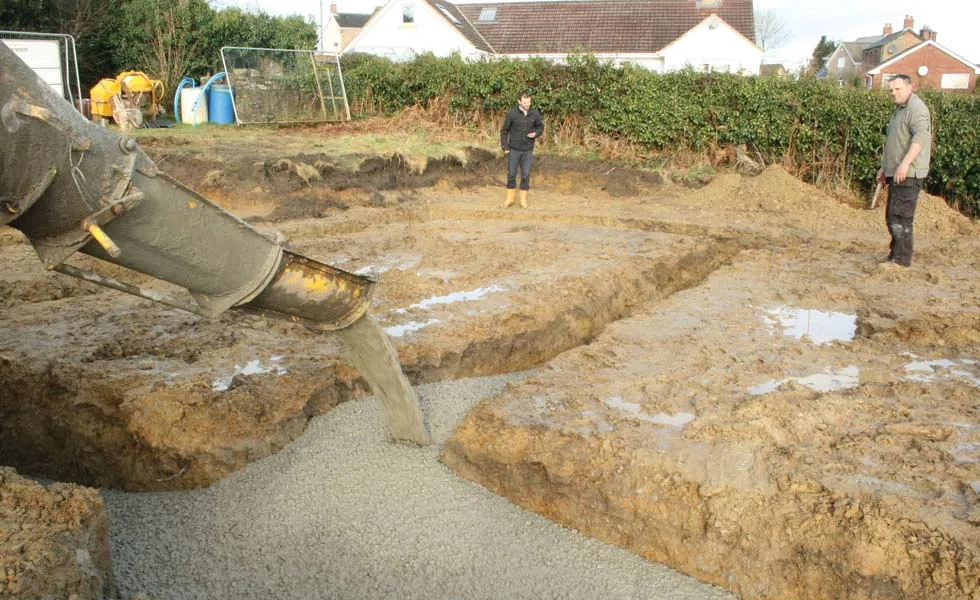
Begin pouring the footings using either a pump or labourers with barrows(Image credit: Homebuilding & Renovating)
If your site is difficult to access, it may be worth considering a concrete pump. This can work out more cost-effective than a few bodies with barrows.
Top Tips for Laying Building Foundations
Keeping the Site Tidy When Laying Building Foundations
Before you fire up the digger you’ll need to decide what’s going to happen to the spoil. If it’s staying on site you may need to hire in a dumper so that it can be stored in a suitable place where it won’t interfere with the build.
Otherwise, you’ll have to organise lorries to take it to a tip. The turnaround time, or distance to the tip, will dictate how many lorries are needed to maintain continuity on the dig.
You will also need to decide whether you’ll be able to load the concrete directly into the trenches or whether a pump will be needed. If you do decide on a pump — always a good idea if more than three loads are anticipated — then it will need to be booked and the concrete suppliers advised so that their mix and turnaround time can be adjusted to facilitate a continuous pour.
Getting Lorries to Site
If the concrete is being directed from a lorry into the trench then you need to make sure that there is hardstanding and stable ground for it to park.
Most mixes can be ‘pulled’ around the trenches using rakes, but if the sides of the trenches are unstable this may cause collapses and unwanted contamination of the concrete. (Shuttering the trenches prior to pouring can aid in this instance.)
Lorries have extension ramps but these can usually only reach for around 4m at most. Unless the lorries can off-load at various convenient points around the building, then it’s best to use a pump.
Adding a Basement When Building Foundations
If your ground conditions appear difficult, you might do well to consider building a basement. If you are expecting to spend, say, £30,000 on getting out of the ground, then you are maybe halfway towards the cost of a basement and you may find that you are able to add considerably more value to the house than the additional cost of a basement build.
Get the Homebuilding & Renovating Newsletter
Bring your dream home to life with expert advice, how to guides and design inspiration. Sign up for our newsletter and get two free tickets to a Homebuilding & Renovating Show near you.
Bruce is a third generation builder, based in the South West, with over 30 years’ experience in the building industry. He specialises in new build homes, extension and renovation projects, and his even built homes for self build industry guru David Snell. Bruce has recently completed his latest self build.